
- Overview
- Quick Start
- Introduction
- Guides
- Client Libraries
- API Reference
- Examples
- DDD Resources
Starting a new project
Starting off a new project goes smoother when you have an efficient and straightforward development flow to rely on. In this guide, we describe how we usually start and develop new projects.
While the key stages of the development process are described in the Introduction section, this guide provides more hands-on details on the steps that we follow while working on a project.
TL;DR
In short, please follow the next steps to have a consistent and joyful development flow.
Each step and sub-step below results in a separate Pull Request adding its artifacts to the repository.
Conduct EventStorming to gather domain knowledge. Digitize the Artifact and store it in the code repository.
Pick up a Bounded Context.
Define identifiers for the entities of the selected context.
Define signals:
4.1 Define events.
4.2 Define commands.
4.3 Define rejections.
Pick up a scenario (a use case, a process, or a flow) within the Bounded Context:
5.1. Define entity states for the scenario.
5.2 Implement the scenario server-side functionality in Java code. Cover the business logic with
BlackBoxintegration tests.5.3 Fulfill the scenario vertically: create UI, public API, or a client whichever is required.
Repeat step 5 until all the scenarios are covered.
Repeat steps 2 through 6 for the other contexts.
The sections below describe the development process in more detail.
Getting started with a domain: EventStorming
The first thing to get the project done is to conduct an EventStorming session with the Domain Experts in the chosen field.
The EventStorming allows both the business people and the engineers to start talking using the same “language” fast. It is important for engineers to avoid using technical jargon.
The results of the EventStorming (all the stickies) are captured as the Artifact and stored as a part of the project documentation.
We store the EventStorming Artifact electronically as images under the project root
in the /docs/eventstorming/ folder. If the session is performed offline, the photos
of the EventStorming board are stored in the repository. In case of an online session,
the screenshots of the board are stored.
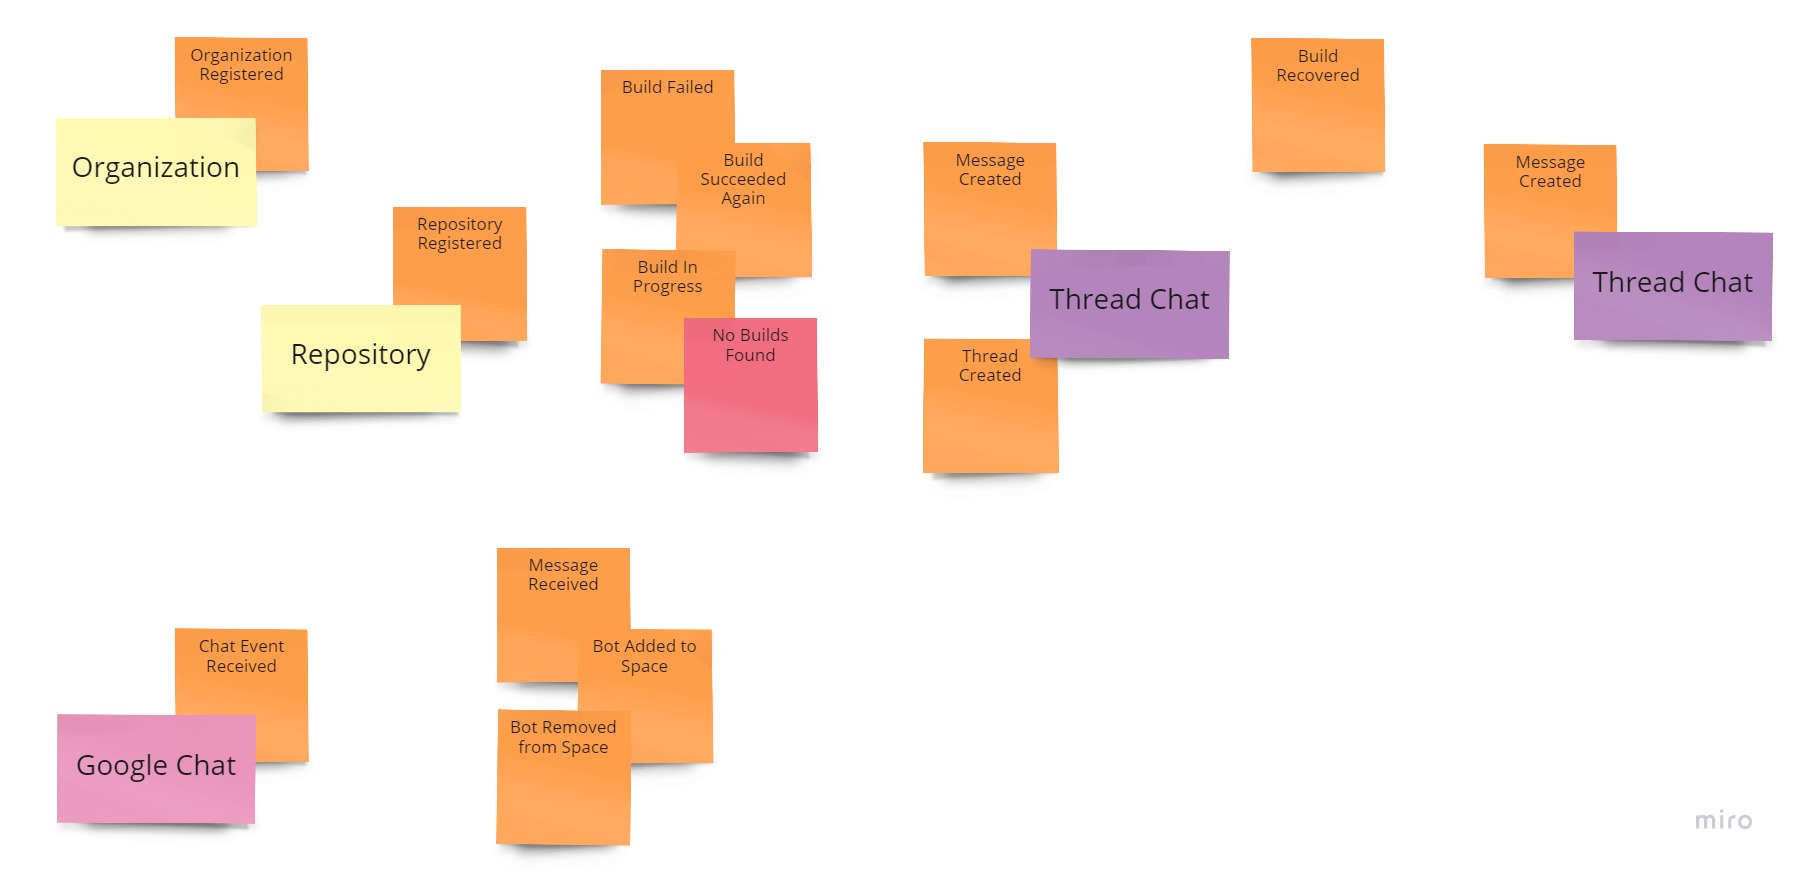
An example of the EventStorming board.
After the session, a dedicated person creates a Pull Request with the Artifact, and the team reviews it once again. This first EventStorming is usually addressed as a “Big Picture” and gives the team and the experts a broad overview of the problem they are trying to solve.
Going forward, the next EventStorming “Process Modeling” and “Software Design” sessions produce updates to the Artifact.
Depending on the size and the scope of the project, you may need to conduct multiple EventStorming sessions with different experts.
Limiting the scope: pick up a Bounded Context
While the temptation to dive into the development of everything right away may be humongous, we recommend limiting the development scope down to only one Bounded Context.
We follow the rule: “Eat an elephant one bite at a time”.
You may need another EventStorming session to go into more detail.
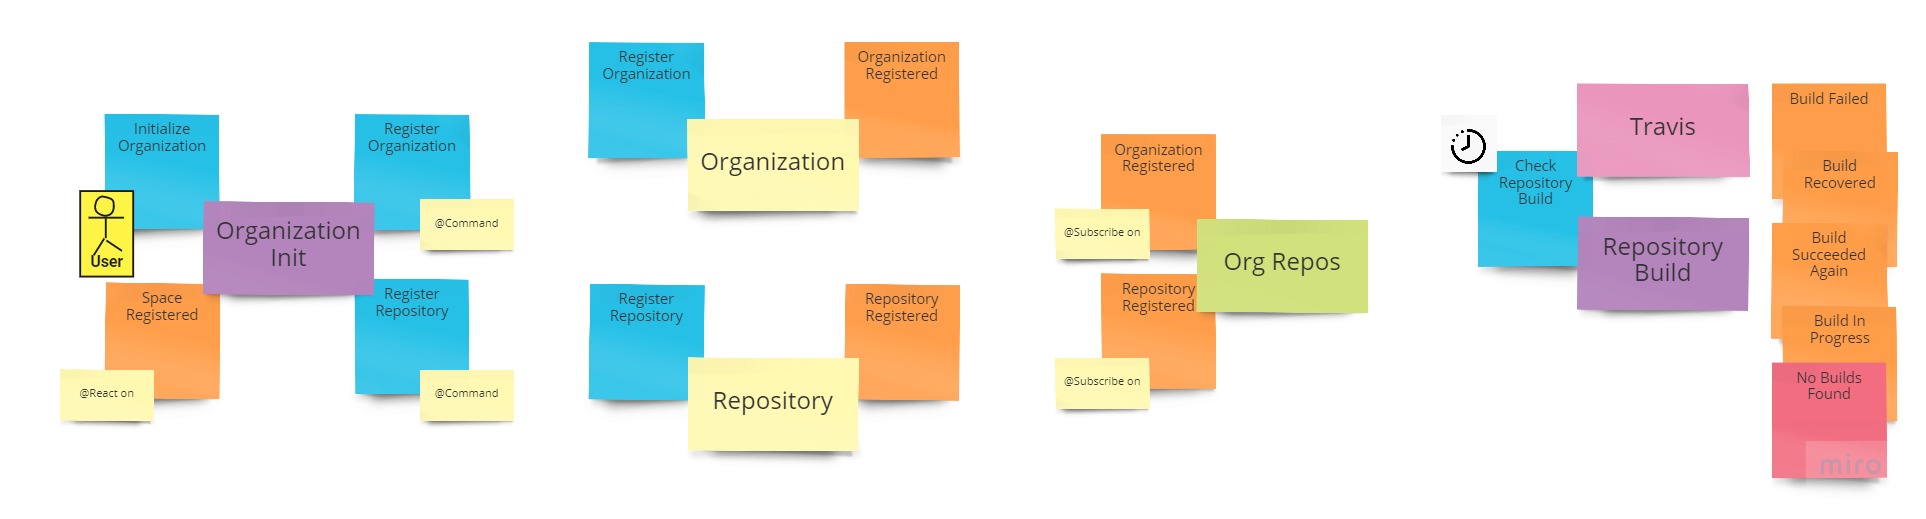
An example of a Bounded Context.
Shaping the language
With the selected Bounded Context in mind, we continue with the creation of the first code artifacts of the project. During this step we define Protobuf messages that mold the Ubiquitous Language of the context.
The results of these efforts are the .proto files grouped under a specific
package in the proto folder.
If you are new to Protobuf, please see the Naming Conventions section for how to name things in the proto code.
While writing the protos, make sure to document all messages. It’s time to unleash your technical writing skills and lay the project’s ground-standing foundation. Here you may want to introduce some domain-level validation logic. Check out the Validation guide for details.
Identifiers
We put this step aside because in Reactive DDD entities reference each other using the typed identifiers.
Consider following the Vaughn Vernon’s rule on Aggregates from the “Effective Aggregate Design Part II” that is applicable to any entity: “Reference other Aggregates by Identity”
We recommend using message-based identifiers over simple types to make the API strongly pronounced
and type-safe. To make things obvious, consider putting the IDs of the context into the file named
identifiers.proto. This file will be imported when defining events,
commands, entity states, and other types of the selected context.
Please consult with the Naming Conventions guide for our recommendations on naming the identifier types.
When the ID types are defined, please create a Pull Request so that the team can review and polish the code of this important development step.
Events
When the IDs are defined it’s time to define event messages. The events are named
as facts formulated as past participles, e.g. RepositoryRegistered or TaskCreated.
They are defined in files with the _events.proto suffix (e.g. order_events.proto,
customer_events.proto). If your context is small it can be just events.proto.
Create a Pull Request with the event definitions when they are ready.
Commands
Similar to events, command messages are defined in files having the names ending
with the _commands.proto suffix (or just commands.proto for a small context).
Commands are defined as imperative in a form of “do something”, e.g.
RegisterRepository or CreateTask.
Finalize defining commands with a Pull Request.
Rejections
Rejections are special events that denote a command failed for a reason.
The rejection messages are defined in files with the _rejections.proto suffix
(or just rejections.proto). For more information on the rejections, please refer to the
“Working with Rejections” guide.
Create a new Pull Request and review rejection definitions.
Picking up a scenario
A scenario is a defined finite part of the context. It can be either a use case, a business process, or a complete functional flow.
If you see it getting too big, it may be worth splitting it into two or more smaller parts. For example, you may want to start with a single Aggregate or a Process Manager.
Entity states
The entity state is a holder of the entity data. It does not represent a whole entity but depicts the shape of its data.
The definitions of entity states are gathered in a file named after
a business model thing. E.g. for a Task aggregate, the definitions
would be defined in a task.proto file.
As with the other steps, create a Pull Request to review the entity states with the team.
Adding behavior
We recommend implementing the scenario with the Java implementation of the domain
entities and the BlackBox integration tests. The BlackBox tests are
the recommended way to test scenarios in Spine. They are specifically built to allow you to check
the business logic the same way it works in the application.
All the code must conform to your standards of the code and documentation quality and be tested thoroughly.
When a backend for the scenario is done a new PR is created and reviewed.
Fulfilling the vertical
We usually do the vertical development, meaning an engineer starts with the domain definition, continues with its implementation, and finishes with the front-facing tasks.
Depending on your team workflow and preferences this step can take place in parallel with the previous one.
As noted, the scope of this iteration is to prepare the front-facing part for the scenario: either a UI if one is needed, or the public API, or a dedicated idiomatic client.
As soon as the implementation is ready, another PR and review come along.
Start over again
When you have finished with the scenario, pick up a new one and start it over again following the PR and review process.
As soon as you are done with the Bounded Context, move on to the next one.
Summary
While developing a project, make sure to split the development by Bounded Contexts. Pick up a context and split it into scenarios. Make sure each of the development steps results in a separate Pull Request with dedicated artifacts in the source code repository. Opt for smaller, fine-graded Pull Requests instead of cluttered and complicated ones.